Rigs – an essential part of pole fishing. You have two choices. Buy ready made rigs or make your own.
Ready Made Rigs
Probably
the easiest way for a beginner to start. But you have to be careful,
there are good and bad. And are they the right tool for the job?
Bear in mind that a ready made rig will already be shotted and most
likely have a hooklength attached. So you have to ensure that what
you buy is actually what you need for the venue you are going to
fish.Stick to a major brand such as Drennan who's rigs are made with the AS (Alan Scotthorne) floats or Daiwa & Shakespeare, equally good names.
You can get custom made rigs tied to order. Just search the internet for “hand made pole rigs” or “custom pole rigs” to find some suppliers.
Most ready made rigs come on a huge length of line. Unless you are fishing a ridiculously deep water the rig will need to be cut down before use. I will explain how much when we finally get fishing.
The
one thing that puzzles me about ready made rigs is what you do with
the bits when the rig gets too short or is trashed. You can't just
throw the float and hooklength away surely. Not surprising therefore that as a pole angler of
long standing I of course make my own.
Making Your Own Rigs
What You Will Need -
Floats – Discussed in
part 4
Silicone Tubing – I
buy from eBay and use 0.5 and 0.7mm
Line – See below
Shot – Discussed in
part 4
Hooks/hooklengths –
See below
Winder – Just make
sure you buy winders long enough to take your chosen floats.
Anchor – Available
from all tackle shops.
Loop Tyer/Sizer -
Optional
Line
Most if not all pole
anglers will use a “high tech” line. These lines are also known
as pre-stretched. They are a thinner diameter for the same breaking strain than those used for
reel lines. Being pre-stretched they are, in material science terms,
brittle and less robust. The elastic in the pole provides the shock
absorption required to prevent breakages.
You will find that when
anglers talk of lines traditional mono used on a reel is usually
referred to by breaking strain, high tech lines tend to be referred to
by diameter.
I use Preston Reflo
Power for no other reason than it is what my local tackle shop sells.
I am aware that if you do your own measurement that this line is
around 0.02mm thicker than stated on the label. I take the stated
diameter as a guide not an absolute.
Two simple questions for me - am I getting bites and am I loosing fish? If I am not getting bites I may need a thinner line, if I am having fish break me then I need thicker. What I want is the balance between the two, the diameter number I use therefore is almost irrelevant. Its a bit like knowing I am comfortable in an XL tee shirt. I really don't care what the measurement of chest size XL is supposed to be. But I know it is smaller than XXL and larger than L.
Choose your favoured or available line and learn how to use it.
Hooks
These will very much
depend on what type of fishing you are doing and personal preference.
I would suggest that wherever possible people will use spade end
hooks though eyed have their place with heavier lines. This is
because it is more difficult to get a secure whipping on a spade end
hook with thicker lines.
For this reason I use
spade end hooks with Reflo Power 0.13mm and eyed hooks with line
thicker than that.
Spade end hooks being a
little lighter can aid getting a better presentation. A small
difference but can be vital when targeting silvers.
I can only really talk
about the hooks I use and will list them and the lines they are
teamed with just as a guide. For further options I suggest asking on
a forum like maggotdrowning.com.
Commercial Fishery
(barbless)
Kamasan B611, spade end
size 16 with 0.13 Reflo Power, size 18 with 0.10. Bait – soft
pellets, corn, maggot, meat
Kamasan B911, eyed size
16 with 0.17 – hard & soft pellet, corn, meat
Canal Silvers (barbed)
Sensas 3050, spade size
20 with 0.06 – bread, maggot, pinkie, squatt, caster
Kamasan B511 size 18
with 0.08 or 20 with 0.06 – caster, maggot, pinkie, squatt
River (barbed)
Kamasan B511 size 18
with 0.10 – maggot, caster, hemp, worm or 16 with 0.10 specifically for hemp
If I feel I need a
stronger hook and line combination on the canal for targeting tench,
bigger bream or even carp I will turn to my commercial carp
hooks/line.
Hooklengths
I have settled on two
lengths of hooklength but this is a subject that divides opinions
amongst pole anglers. Everyone has their favoured length. Sometimes
this will be species dependant. Again I will state what I do.
Most of the hooklengths
I use, and I make my own, are ten inches. I like this length for a
few reasons, but I cannot state for certain that my reasoning is
sound or makes a difference.
First it gives the last
twenty inches of the baits fall hopefully as natural a look as
possible. As I never put shot on a hooklength it keeps the last
dropper shot above the eyeline of the fish. It allows me to go up to nine inches overdepth without affecting the shotting. I
also think it allows the bait to act more naturally when settled as a
passing fish can waft it more easily than were I to have shot closer.
I will use this length
on both commercials and rivers. I also use it on canals where I want
to fish with a few inches of line on the deck. Useful I feel when
the canal may tow due to a lock opening.
The other length I use
is four inches. I reserve this mainly for fishing at dead depth on a
canal or stillwater silvers fishing. I really can't justify my
choice with logic here. Its just that I have succumbed to the theory
that the shy bites you may get mid-Winter from roach on a canal may
show up better with a short hooklength. I combine this with a heavy
final dropper like a No.9 who's movement I think will have a greater
effect on the float.
I also use four inch
hooklengths on commercials when specifically targeting F1 carp. I
have to admit that I don't get on well with these fish and thus
follow the advice of the experts who tell me shorter hooklengths are
the way to go.
Having given this subject some thought while writing this I do wonder if the length of hooklength I use may be influenced by the way different species actually take the bait. Roach are a darting type fish. By this I mean they are very mobile and move around a swim quickly. Just as quickly they can, I believe, take and reject a bait but are constantly moving, particularly on stillwaters. Carp on the other hand tend to graze or grub about sucking in food and thus hookbait without moving far, and not quickly.
I think therefore that the shorter hooklength works for roach because they move the final dropper while carp actually pull the rig down when sucking in a bait. But don't ask me about F1s because these fish still baffle me!
Making Up Rigs
This may seem like a
simple task to some but I'll go through it just in case anyone isn't
sure.
First thing we need is
a length of line but how long? You don't want to waste line but on
the other hand you don't want to be caught out with rigs that are too
short. In my blog on my simple approach to pole fishing I detail the
lengths of rigs I make for commercials. In the main this is decided
by the float and the rig's intended use. The following is a simple
run down, lengths are without hooklength.
4 foot – for margin
or up in the water fishing with a dibber or 0.2g short float
7 foot – for full
depth fishing as most commercials are between 4 & 6 foot deep,
float will be 0.5g
10 foot - for deeper
commercials or days when the weather is poor when I need a heavier
float, 1g and heavier floats.
My canal rigs are four
and six foot as the Grand Union that I fish is only a maximum five
foot deep and regularly I am looking to fish just in just 3 foot of
water up the far shelf.
Rivers I make rigs of seven and ten foot with appropriate floats.
The way I make my rigs is as follows – cut a length of line and tie a loop with an figure of eight knot at what will be the top end. Thread on the float followed by three short lengths (3-5mm) of silicone tube. The silicone should be snug on the stem but not overly tight. Three pieces for two reasons. First, if one breaks you still have two. Also having three means that the stem will not bend as easily when moving the float on the line. Important if you use wire stemmed floats, then even four pieces of silicone may be advisable. The silicone is then threaded onto the stem with one piece at the very bottom, one just under the float and the other midway.
The silicone just under the float is not tight to the body but around 1cm down the stem. This reduces the angle the line makes around the float body and thus reduces the pressure that cuts the line into the body when playing a fish.
If using an olivette
either add the inline olivette now or the two pieces of silicone that
will hold a pronged version in place.
I now tie the bottom
loop. I think it is worth taking the trouble to use a loop tyer or
sizer to get consistent sized loops.
Whether you add shot at
this point or wait until you get to the bank is up to you. I add the
shot when I make the rig. But as I know my floats and what shot they
will take plus I know what shotting pattern I am going to use most of
the time it saves time on the bank. And I always struggle to set up
in time for a match so saving minutes is vital to me.
Shotting and shotting patterns will be discussed in the next section.
Shotting and shotting patterns will be discussed in the next section.
Whether you add a
hooklength at home or on the bank is up to you. I do both. Because
of the limited range of hooklengths I use I know what will go on the
rig and so will add some hooklengths and take other rigs without.
Again a bit of a time-saving ploy.
Once done you can store
your rig on its winder. You will see that most winders have a
shallow and deep side, the float needs to sit on the deep side. May
be obvious to some but ….. Anchor in place and if necessary mark
the winder with the rig's details. Trust me you will not remember
what is on what winder unless, like me, you use a limited range of
rigs and use the winder colour to identify them.

A typical rig selection for a day on a commercial. Actually several days.
Light blue - 0.2g float on 4ft of 0.17 lineDark blue - 0.5g float on 7ft of 0.17 line
Yellow - 1g float on 10ft of 0.17 line
Green - 0.5g float on 7ft of 0.17 line (thinner & longer bristle than the dark blue)
You don't NEED loads of variations in order to catch fish. I do have some other rigs that get swapped in for specific venues or time of year. These are explained fully on my simple pole fishing post. But I would be comfortable going to almost any commercial water in the Summer with this set of rigs.
And the same for my canal rigs.
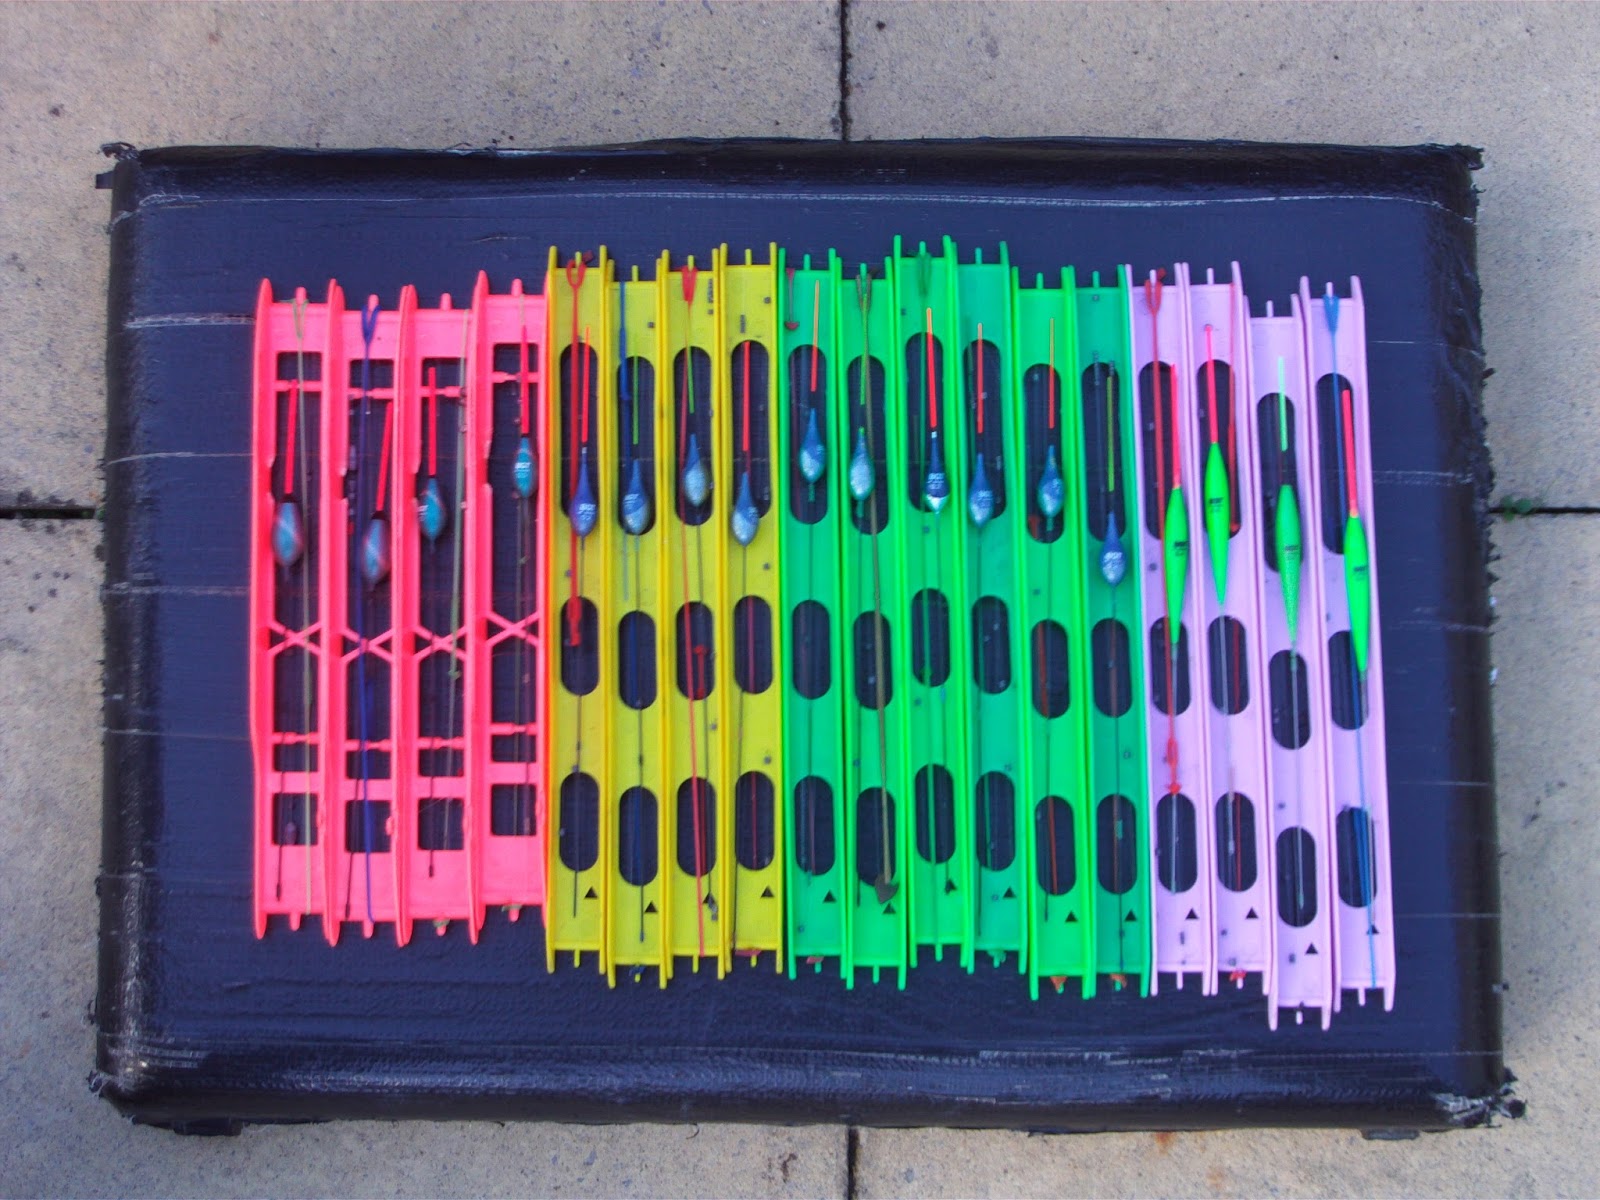
All on 0.11 line
Pink - 0.5g and 1g floats on 6ft of line
Yellow - 0.2g on 4ft
Green - 0.2g on 6ft
Lilac - 0.4g on 6ft
No comments:
Post a Comment